Chapter 2
GETTING STARTED
In this Chapter instructions are provided for installing WAMIT and making simple test runs in the PC/Windows environment. The basic sequence in a typical application of WAMIT is (1) prepare the input files; (2) run WAMIT. The principal results are then contained in output files which may be printed and post-processed. This architecture is illustrated in Figure 1.1.
The two principal subprograms of WAMIT are POTEN and FORCE. POTEN solves for the velocity potential on the body surface, and optionally also for the source strength. FORCE evaluates physical parameters including the force and motion coefficients, and field data including the fluid pressure, velocity, and free-surface elevation. The principal input files to the subprogram POTEN are the Potential Control File (POT) which specifies parameters including the fluid depth, wave periods, and wave heading angles, and the Geometric Data File (GDF), which describes the geometry of the structure to be analyzed. These files are discussed briefly below, and in more detail in subsequent Chapters. The principal input files to the subprogram FORCE are the Force Control File (FRC), which specifies inputs regarding the body dynamics, and the P2F file (‘Poten to Force’) which transfers data from POTEN to FORCE.
Three additional input files should also be used: (1) Licensed users of WAMIT V7PC must utilize a unique input file userid.wam, which identifies the license; (2) the optional input file fnames.wam is recommended to specify the input filenames; and (3) the configuration files (config.wam and/or *.cfg) specify parameters and options which are required by the program. Samples of the fnames.wam and configuration files are included with the test runs; for example the files test01.wam and test01.cfg are intended for use with TEST01.
By default in WAMIT, the file fnames.wam lists the filenames of the POT, CFG, and FRC files. The GDF filenames are included in the POT file.
In Version 7 it is possible to use both the config.wam and *.cfg files together, as explained in Section 4.7. It is recommended to use config.wam to specify inputs which are the same for most or all runs, and to use *.cfg with an appropriate filename to specify inputs which are specific to that particular run. Thus the file config.wam delivered with the standard test runs includes the parameters RAMGBMAX, NCPU, and USERID_PATH, which are the same for all test runs; the other parameters required for each run are input in the separate files test*.cfg.
2.1 INSTALLATION AND SETUP
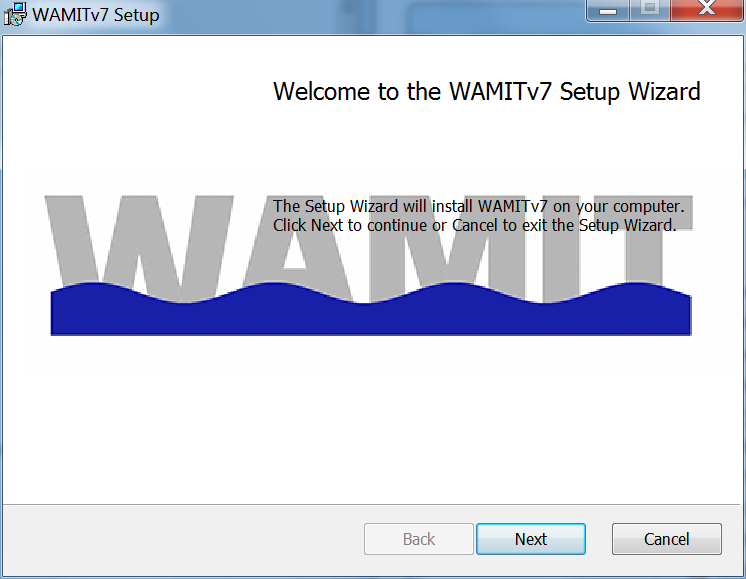
The PC-executable Version 7PC is installed as a .msi install package. The naming convention for this package is wamit_v7nnn_x64w_t.msi, where nnn represents the version number and release (version 7.101 is v7101) and t is the package distribution (l for lease versions and s for site versions). To begin the install of WAMIT using the .msi installer, simply double click the .msi file and proceed with the installation as shown in Figure 2.1. Click Next to begin the installation setup.
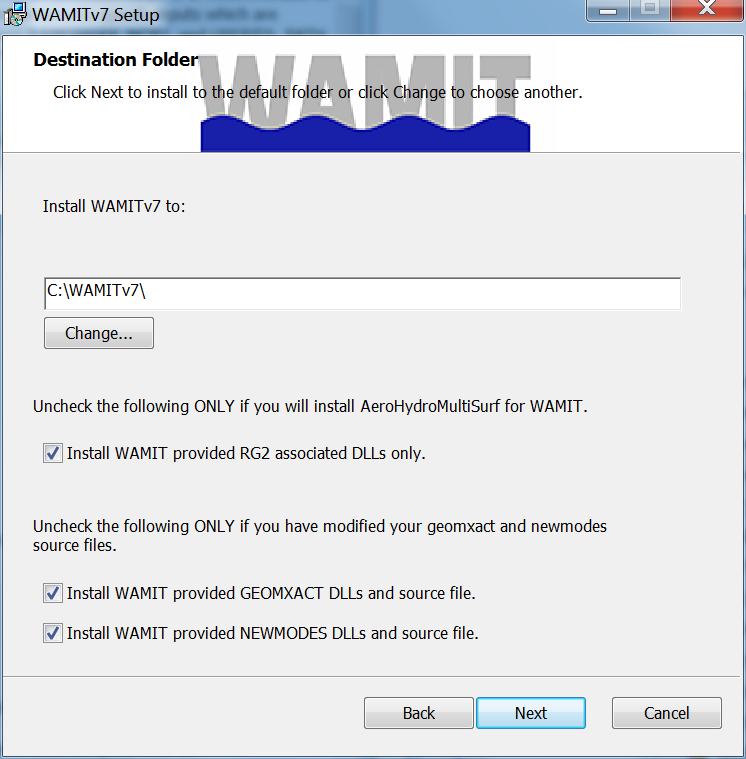
For the install to proceed, the main installation directory (folder) needs to be defined as shown in Figure 2.2. The recommended name is c:\wamitv7, but the user may prefer to use a different drive or directory name, with a maximum length of 40 characters for the string. This directory should be accessible by all users on the computer. If a different drive or directory name is used, this must be specified as USERID_PATH in the configuration file, as explained in Section 4.7.
First time installs of WAMIT that will not be using MultiSurf for WAMIT, click Next to begin the installation process. Users that will be installing MultiSurf for WAMIT, should uncheck the checkbox labeled Install WAMIT provided RG2 associated DLLs only. Users that are upgrading WAMIT and have modified existing geomxact.f, newmodes.f and the associated DLLs should uncheck the respective check boxes to retain their versions of these files before clicking Next to begin the installation process.
The WAMIT software includes the main executable program wamit.exe, the DLL files listed below, a complete set of input files for the standard test runs TESTn (n=01,02, ...), and the formatted output files TESTn.OUT for these test runs. The included text file readme.txt includes an outline of the directory tree and files. If any difficulties are encountered during installation and testing the user should confirm that the subdirectories and files correspond to the description in readme.txt.
The PC-executable Version 7PC includes additional dynamic link library files (DLL) which
must be installed in the same directory (i.e. ‘folder’) as the executable file wamit.exe, or in a
different folder which is included in the system path. By default, the .msi installer does this for
the user. If these DLL files are missing the program will not run, regardless of the inputs
and options specified. The required DLL files include special WAMIT DLL files and
also special Intel or Microsoft DLL files. The three required WAMIT DLL files are
geomxact.dll
newmodes.dll
rg2wamit.dll
The extended Version including the capability to input MultiSurf models requires one additional DLL file, rgkernel.dll, and an extended version of rg2wamit.dll, as explained in Section 7.7.
Version 7PC is compiled using Intel Visual Fortran (IVF), Version 12.1. The following DLL
files are required to run executable code compiled with IVF:
libifcoremd.dll
libmmd.dll
libiomp5md.dll
msvcr100.dll
svml_dispmd.dll
These DLL files are distributed by Intel and may be redistributed to all users. Copies of these files are included with each distribution of WAMIT. Users may encounter a problem on some older PC systems, indicated by the runtime error message ‘The system cannot execute the specified program’. This problem can be overcome by downloading and installing the Microsoft Visual C++ 2005 Redistributable Package, which is available from Microsoft.
After the install is complete, a Program Folder will appear in the Start Menu called “WAMIT v7”. This has links to the README file, manual and shortcut to wamit.bat, which opens a command window in the WAMIT install directory. Users wishing to set up a specific run environment for WAMIT can edit wamit.bat with any text editor. To enable easy access to the WAMIT executable directory, copy the shortcut in the Program Folder to the Desktop.
To authenticate the install, the user must copy the WAMIT supplied userid.wam file to the install directory. Users that have lease licenses must also execute the instructions outlined in the README_LEASE.txt file provided in their distribution to complete their activation step.
2.2 DEMONSTRATION PROGRAMS
A special demonstration version of WAMIT can be downloaded as a .msi install package from the web site www.wamit.com. This program, wamit_demo.exe, can be used for demonstration purposes without obtaining an end-user license, subject to the conditions stated in the website. The installation and use of this software are the same as the licensed version, with the following exceptions:
- The program only accepts geometry inputs from the standard input files for the test runs described in the Appendix.
- The license identification file userid.wam and some DLL files are not required.
- The program runs are interrupted after display of the header, and the user is prompted to press the Enter key to continue the run.
The .msi installer file includes all of the input files required to execute the standard test runs.
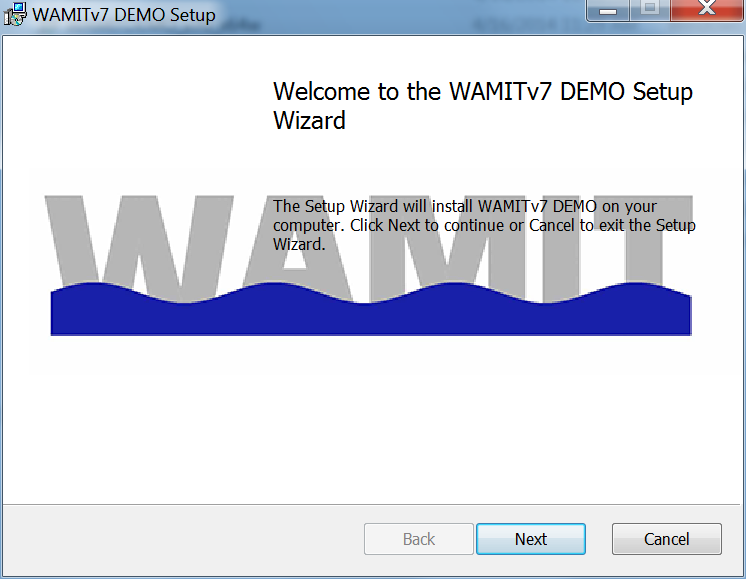
To begin the install of WAMIT DEMO using the .msi installer, simply double click the .msi file and proceed with the installation as shown in Figure 2.3. Click Next to begin the installation setup.
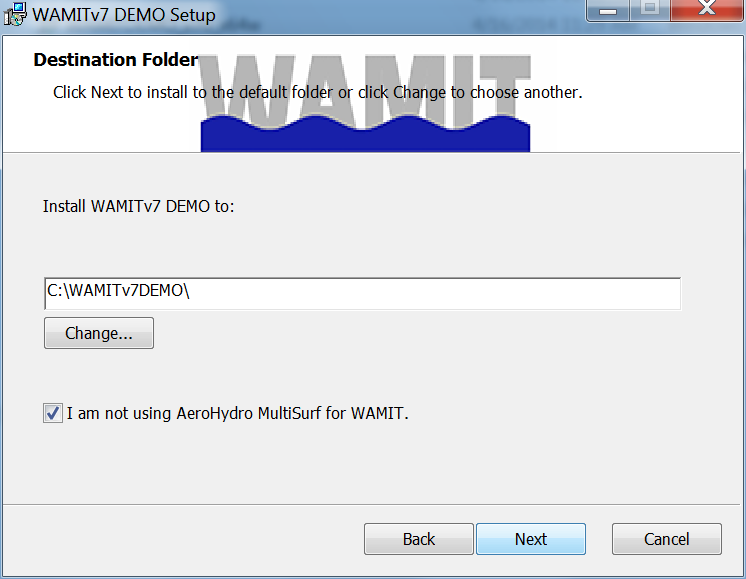
For the install to proceed, the main installation directory (folder) needs to be defined as shown in Figure 2.4. The recommended name is c:\WAMITv7DEMO, but the user may prefer to use a different drive or directory name, with a maximum length of 40 characters for the string. This directory should be accessible by all users on the computer.
First time installs of WAMIT DEMO that will not be using MultiSurf for WAMIT, click Next to begin the installation process. Users that will be installing MultiSurf for WAMIT, should uncheck the checkbox labeled I am not using AeroHydro MultiSurf for WAMIT.
After the installation, README file will automatically open with basic instructions on how to execute sample test runs. Additionally, a Program folder entitled ‘WAMIT v7 DEMO’ is included as part of the installation which contains a link to the user manual and wamit.bat. Users may use this link to open a DOS Command Prompt Window in the WAMIT DEMO install directory.
2.3 STANDARD TEST RUNS
Various standard test runs are available to illustrate different types of applications and features of the program. The results of these test runs can be used to confirm that the installation and setup of the program have been performed correctly by the user. The test runs also provide opportunities to use (and modify) existing input files, for tutorial purposes. The remainder of this Chapter is intended to guide new users through these procedures. Descriptions of each test run are included in Appendix A.
If the WAMIT software is installed in accordance with the instructions above, the required .EXE and .DLL, and userid.wam files will be installed in the directory c:\wamitv7. All required input files for the standard test runs will be installed to the subdirectory c:\wamitv7\testruns. Benchmark versions of the output files test*.out are installed in the subdirectory c:\wamitv7\testruns\out. These benchmark output files can be compared with results obtained by the user to ensure that the software is installed correctly.
Before running WAMIT with the standard test runs, the user needs to open a DOS Command Prompt Window in the WAMIT install directory. This can be done by executing wamit.bat by selecting ‘Start’, ‘Programs’, ‘WAMIT v7’, ‘WAMIT v7’ or (1) open a DOS Command Prompt Window (in the Windows environment a Command Prompt Window is opened by clicking on ‘Start’, ‘Programs’, ‘Command Prompt’), and (2) change to the install directory by entering the command cd \wamitv7. Once the DOS command prompt is open and in the WAMIT install directory using either option, enter the command cd testruns.
Since the executable file wamit.exe is resident in the directory c:\wamitv7, the appropriate command to execute WAMIT is ‘c:\wamitv7\wamit’.
There are two alternative shortcuts which may be used to simplify this command: (1) add c:\wamitv7 to the system PATH or to the system PATH when executing the installed wamit.bat file or (2) use the batch file runwamit.bat which is supplied in the testruns subdirectory.
2.4 RUNNING TEST01
Test run 01 evaluates the added-mass and damping coefficients, exciting forces, motions, wave elevations, field pressures, fluid velocities and drift forces for a freely-floating truncated vertical circular cylinder of radius 1.0m and draft 0.5m in infinite water depth for three wave periods and one wave heading angle. Further details are contained in Section A.1 in Appendix A.
The corresponding input files test01.gdf, test01.cfg, test01.pot, and test01.frc are included in the subdirectory c:\wamitv7\testruns. In order to specify the appropriate filenames during the run, first copy the file test01.wam to the file fnames.wam. (Copying is recommended, in preference to renaming the file, to preserve the original file.) The appropriate DOS command is
- copy test01.wam fnames.wam
Next execute WAMIT. This can be done by entering wamit if the WAMIT install directory has been added to your path. Otherwise, runwamit test01 will execute the provided runwamit.bat file for test01. This batch file will remove old files associated with test01, copy test01.wam to fnames.wam and execute WAMIT in one step.
During execution of the subprogram POTEN the monitor displays the starting time, and after the solutions for the velocity potentials are obtained for each wave period a new line of information is displayed including the wave period, time, and the maximum number of iterations required for the radiation and diffraction solutions. After the first wave period the computational time required for each subsequent period is reduced, since the integration of the Rankine components of the source potential are evaluated initially and saved for reuse. After the last period the file test01.p2f is saved on the disk, storing the velocity potentials and other inputs to the subprogram FORCE. Output from FORCE will appear relatively quickly on the screen, and the same output is stored in the file test01.out. The latter file includes useful identification information concerning the inputs, body parameters, run times and dates. This is followed for each period by tabulations of the hydrodynamic parameters requested in test01.frc. Assuming the standard version of test01.out has been saved in a subdirectory, as recommended in Section 2.1, the data in the new version of test01.out can be compared with the standard file with the same name. On a contemporary PC the total run time for TEST01 should be a few seconds.
2.5 RUNNING TEST11
TEST11 is intended to complement TEST01, using the higher-order method of solution (ILOWHI=1). The body dimensions and other inputs are the same, but the surface of the cylinder and the solution for the velocity potential are represented in a more accurate, continuous manner by B-splines, as explained in Chapter 7.
To run TEST11 follow the same procedure outlined above for TEST01, but replace ‘01’ by ‘11’ in all references to filenames. A comparison of the results from these complementary tests is summarized in Section A.11 of Appendix A.
2.6 OTHER TEST RUNS
The procedure for running the other test runs is the same as explained above, except for copying the appropriate files to fnames.wam from the original versions test*.wam where ‘*’ is the test number. Alternatively, runwamit test* will perform the same functionality using the supplied runwamit.bat file.
A special batch file runtests.bat is included in the licensed version and a similar file rundemo.bat in the demonstration version. Executing the corresponding batch file command will run all of the tests in succession. The display shown on the monitor gives some indication of the progress through the set of runs from test01 to test25. The entire set of runs may take several minutes, depending on the computer.
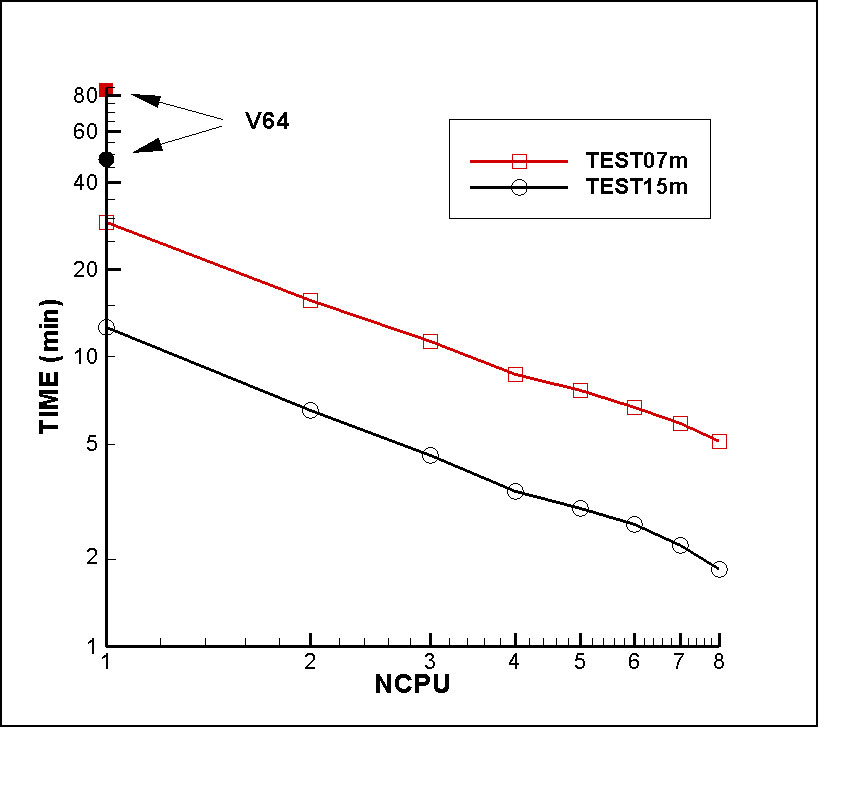
2.7 USING MULTIPLE PROCESSORS
In Version 7 parallel processing can be performed on systems with multiple processors (CPU’s, also known as ‘cores’). Depending on the inputs and hardware, the total run time can be reduced substantially. If the system includes more than one CPU, open the file config.wam with a text editor. The default settings in this file are as follows:
RAMGBMAX=0.5
USERID_PATH=\wamitv7
Edit the first line to show the actual number of CPU’s on the system, and save the edited file with the same name. With this change the total run time for all of the standard tests should be substantially reduced. Test14a is a particularly good example, as noted in Appendix A.14.
Instructions for finding the number of CPU’s on the system are in Section 14.6.
Depending on the size of the system RAM it may be appropriate to change the parameter RAMGBMAX, following the guidelines in Section 14.3. The value 0.5 is sufficient for all of the test runs unless NCPU is greater than 16. For older systems with less than 1Mb of RAM the parameter RAMGBMAX should be reduced to about half of the available RAM.
2.8 MEMORY AND STORAGE RESTRICTIONS
WAMIT uses scratch files on the hard disk for temporary storage at runtime. Depending on the run parameters, the total number of scratch files and/or their size may become quite large. Normally these files are deleted by WAMIT after the files are no longer needed, and before the program stops. However some PC/Windows configurations save these deleted files in a ‘recycled’ directory, and this can cause the hard disk to become overloaded. Users who experience this problem should delete the accumulated files in the recycled directory, or alternatively change their system setup to avoid saving a backup of all deleted files.
2.9 MODIFYING THE INPUT FILES
A text editor can be used to edit the input files. Users should refer to Chapter 4 for a complete explanation of the data in these files. A few simple modifications will be outlined here for tutorial purposes, in the context of Test Run 01. Before proceeding further check that the file fnames.wam corresponds to this test run, or re-copy test01.wam to fnames.wam following the instructions in Section 2.4.
As the first modification we might request FORCE to perform additional computations, for the same periods and wave headings analyzed by POTEN, but with modified values of the vertical center of gravity (VCG) and radii of gyration (XPRDCT) in the force control file test01.frc. In the standard file VCG=0.0 (center of gravity in the waterplane) and the radii of gyration are set equal to 1.0 (the three diagonal elements of the XPRDCT matrix). A positive VCG will move the center of gravity above the waterplane, reducing the pitch/roll hydrostatic stability and affecting these RAO’s in longer wave periods. Modifying the radii of gyration should change the same RAO’s primarily at shorter wave periods. It is not necessary to re-run POTEN in this case, provided the file test01.p2f has been retained for the POTEN output. To avoid the extra run time of POTEN, add the line IPOTEN=0 to the configuration file test01.cfg (See Section 4.7, and also the files test07b.cfg and test17b.cfg which include the same line). After modifications are made to the file test01.frc it is advisable to save the modified file with a different filename, and to edit the fnames.wam file to show the corresponding new filename for the force control file. If this procedure is followed, the output file will carry the same filename (with the .out extension) to distinguish it from the original file test01.out. The user may then compare the RAO’s in the different output files to discern the effect of these changes.
As the second modification WAMIT may be re-run with a more extensive list of wave periods. Edit the potential control file test01.pot with the following changes:
- on line 5 change the number of wave periods (NPER) from 3 to 10
- on line 6 replace the three original wave periods by ten new periods in decimal format
- depending on your preference, (1) save the modified file with the original name test01.pot, or (2) save the modified file with a new filename and correct the fnames.wam file on line 2 with this new filename.
Since it is necessary to re-run POTEN in this case, delete the line IPOTEN=0 if this was added to test01.cfg. During the run, if the original filename test01.p2f is retained, the user will be prompted whether or not to overwrite the old output file test01.p2f; overwriting is the simplest procedure to follow, in this circumstance, otherwise the new .P2F filename must be specified before the FORCE run is executed.
The input files for other test runs can be used to illustrate various options and modifications.